Git and Github
Version control fundamentals, branching strategies, collaboration workflows, and best practices.

#Major Use case
- Track the history
- Collaborate
- Open-source projects
#Git Branching
-
It is recommended that when an issue is solved or some features is added to a codebase, make a separate branch to work on that.
-
Code to create a new branch and checkout
bashgit branch new_branch git checkout new_branch #switched to the branch "new_branch" -
Let say you are working on
new_branchand you need to urgent fix the deployed website. So, you need to move to master branch to make a branchurgent_fixto fix the issue. Then simply checkout to master branch and proceed. -
However, before you do that, note that if your working directory or staging area has uncommitted changes that conflict with the branch you’re checking out, Git won’t let you switch branches. It’s best to have a clean working state when you switch branches. The way to do so is stashing and cleaning.
-
After you fix the
urgent_fixissue. commit that issue has been fixed and checkout to master branch and merge.bashgit branch urgent_fix git checkout urgent_fix # After issue has been fixed git commit -m "Issue has been fixed" git checkout master git merge urgent_fix -
You’ll notice the phrase “fast-forward” in that merge. when you try to merge one commit with a commit that can be reached by following the first commit’s history, Git simplifies things by moving the pointer forward because there is no divergent work to merge together — this is called a “fast-forward.”
-
So, now the current status will be master branch is pointing out the same commit as the
urgent_fixissue. and since the urgent_fix has been solved, we need to delete the branch. the code for that is below.bashgit branch -d urgent_fix #Deleted branch urgent_fix -
Now you can switch back to your work-in-progress branch on
new_branchand continue working on it. -
After the work on the
new_branchhas been done, commit that work x has been finished.bashgit checkout new_branch #Switched to branch new_branch git commit -m "The work x has been done" -
It’s worth noting here that the work you did in your
urgent_fixbranch is not contained in the files in yournew_branchbranch. If you need to pull it in, you can merge yourmasterbranch into yournew_branchbranch by runninggit merge master, or you can wait to integrate those changes until you decide to pull thenew_branchbranch back intomasterlater. -
Suppose you’ve decided that your
new_branchwork is complete and ready to be merged into yourmasterbranch.bashgit checkout master git merge new_branch # Merge made by the recursive strategy -
In this case, the commit on the branch you’re on isn’t a direct ancestor of the branch you’re merging in, Git has to do some work. In this case, Git does a simple three-way merge, using the two snapshots pointed to by the branch tips and the common ancestor of the two.
-
Git automatically creates a new commit that points to it. This is referred to as a merge commit, and is special in that it has more than one parent.
#Git Conflicts
-
Occasionally, this process doesn’t go smoothly. If you changed the same part of the same file differently in the two branches you’re merging, Git won’t be able to merge them cleanly. If your fix for issue #53 modified the same part of a file as the
urgent_fixbranch, you’ll get a merge conflict. -
Git hasn’t automatically created a new merge commit. It has paused the process while you resolve the conflict. If you want to see which files are unmerged at any point after a merge conflict, you can run
git statusbash$ git status On branch master You have unmerged paths. (fix conflicts and run "git commit") Unmerged paths: (use "git add <file>..." to mark resolution) both modified: index.html no changes added to commit (use "git add" and/or "git commit -a") -
Anything that has merge conflicts and hasn’t been resolved is listed as unmerged. Git adds standard conflict-resolution markers to the files that have conflicts, so you can open them manually and resolve those conflicts.
-
After Manual fixing, You can run
git statusagain to verify that all conflicts have been resolved.bash$ git status On branch master All conflicts fixed but you are still merging. (use "git commit" to conclude merge) Changes to be committed: modified: index.html -
If you’re happy with that, and you verify that everything that had conflicts has been staged, you can type
git committo finalise the merge commit. The commit message by default looks something like this:bashMerge branch 'new_branch' Conflicts: index.html # # It looks like you may be committing a merge. # If this is not correct, please remove the file # .git/MERGE_HEAD # and try again. # Please enter the commit message for your changes. Lines starting # with '#' will be ignored, and an empty message aborts the commit. # On branch master # All conflicts fixed but you are still merging. # # Changes to be committed: # modified: index.html #
#Gitignore
-
The
.gitignorefile is a text file that tells Git which files or folders to ignore in a project. -
The entries in this file can also follow a matching pattern:
*is used as a wildcard match/is used to ignore pathnames relative to the.gitignorefile#is used to add comments to a.gitignorefile
-
Example of what the
.gitignorefile could look like:plain# Ignore Mac system files .DS_store # Ignore node_modules folder node_modules # Ignore all text files *.txt # Ignore files related to API keys .env # Ignore SASS config files .sass-cache
#Git rm command
-
The "rm" command helps you to remove files from a Git repository. It allows you to not only delete a file from the repository, but also - if you wish - from the filesystem.
-
--cachedRemoves the file only from the Git repository, but not from the filesystem. By default, thegit rmcommand deletes files both from the Git repository as well as the filesystem. Using the--cachedflag, the actual file on disk will not be deleted. -
-rRecursively remove folders. When a path to a directory is specified, the-rflag allows Git to remove that folder including all its contents. -
—-dry-runNo files are actually removed. With this option (or its shorthand-nnotation), you will only see an output of the files that Git would remove - but no files are actually deleted.bash$ git rm file1.txt #To remove a file both from the Git repository and the filesystem, you can use git rm without any parameters (except for the file's name, of course) $ git rm file2.txt --cached #If you only want to remove the file from the repository, but keep it on the filesystem, you can add the --cached flag $ git rm css/* --dry-run rm 'css/about.css' rm 'css/general.css' #When trying to delete multiple files in a directory or via a glob pattern, you might want to perform a "dry-run" first and see which files would be removed
#Configuring a remote repository for a fork
-
You must configure a remote that points to the upstream repository in Git to sync changes you make in a fork with the original repository. This also allows you to sync changes made in the original repository with the fork.
bash#List the current configured remote repository for your fork. $ git remote -v > origin https://github.com/YOUR_USERNAME/YOUR_FORK.git (fetch) > origin https://github.com/YOUR_USERNAME/YOUR_FORK.git (push) #Specify a new remote upstream repository that will be synced with the fork. git remote add upstream https://github.com/ORIGINAL_OWNER/ORIGINAL_REPOSITORY.git #Verify the new upstream repository you've specified for your fork. $ git remote -v > origin https://github.com/YOUR_USERNAME/YOUR_FORK.git (fetch) > origin https://github.com/YOUR_USERNAME/YOUR_FORK.git (push) > upstream https://github.com/ORIGINAL_OWNER/ORIGINAL_REPOSITORY.git (fetch) > upstream https://github.com/ORIGINAL_OWNER/ORIGINAL_REPOSITORY.git (push)
#Syncing a fork branch from command line
-
Make sure that you have configured the remote repo for a fork.
-
Change the current working directory to your local project.
-
Fetch the branches and their respective commits from the upstream repository. Commits to
BRANCHNAMEwill be stored in the local branchupstream/BRANCHNAMEbash$ git fetch upstream > remote: Counting objects: 75, done. > remote: Compressing objects: 100% (53/53), done. > remote: Total 62 (delta 27), reused 44 (delta 9) > Unpacking objects: 100% (62/62), done. > From https://github.com/ORIGINAL_OWNER/ORIGINAL_REPOSITORY > * [new branch] master -> upstream/master -
Check out your fork's local default branch - in this case, we use
masterbash$ git checkout master > Switched to branch 'master' -
Merge the changes from the upstream default branch - in this case,
upstream/master- into your local default branch. This brings your fork's default branch into sync with the upstream repository, without losing your local changes.bashgit merge upstream/master > Updating a422352..5fdff0f > Fast-forward > README | 9 ------- > README.md | 7 ++++++ > 2 files changed, 7 insertions(+), 9 deletions(-) > delete mode 100644 README > create mode 100644 README.md
#Git config
- Git config is a tool which lets you get or set configuration variables that controls how git will behave.
- To know the username. Use syntax
git config user.name - To know the email. Use syntax
git config user.email - Any time you need help with syntax. Use
git help <verb>like here,git help config
#Things to remember while contributing
- Fork the project repo to which you want to contribute.
- Then clone it to local machine.
git clone link-to-repo
- Always make a separate branch for the fix/new-features
git branch fix-001git checkout fix-001
- Before making pull request pull the latest changes from upstream by checking out to master repo first.
git checkout mastergit pull upstream master
- Then merge the master branch to
fix-001branchgit checkout fix-001git merge master
- Solve the conflicts if any. and then push this branch to remote(origin) repo and make pull request.
git push origin fix-001
#Git merge vs Git rebase vs Git squash
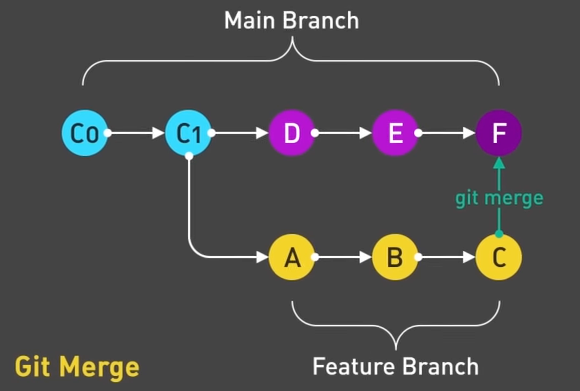
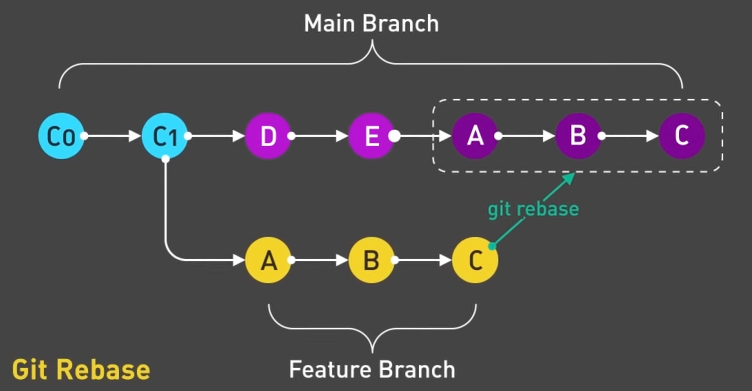
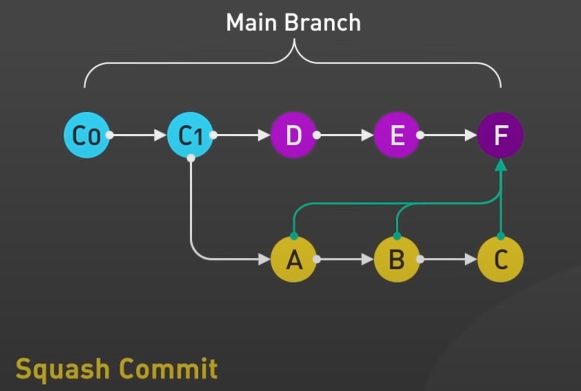
-
Syntax:
bash# Switch to the target branch git checkout target_branch # Merge changes from the source branch git merge source_branch # Switch to the branch to be rebased git checkout feature_branch # Rebase onto the target branch git rebase target_branch # Start an interactive rebase for the last N commits git rebase -i HEAD~N # In the interactive rebase, change "pick" to "squash" or "s" for the commits to be squashed
#Git fetch vs Git pull
Git fetch:
-
Fetches changes from a remote repository to the local repository.
-
Retrieves new branches, updates existing branches, and fetches new objects (commits).
-
Does not automatically merge or modify the working directory.
-
Fetches changes to the remote-tracking branches.
-
Useful when you want to see what changes are available without merging them immediately.
-
Syntax:
shellgit fetch origin master
Git pull:
-
Fetches changes from a remote repository and automatically merges them into the current branch.
-
Equivalent to running
git fetchfollowed bygit merge. -
Updates the working directory with the changes from the remote branch.
-
Assumes you want to integrate the fetched changes into your current branch.
-
May lead to automatic merges, and conflicts need to be resolved if they occur.
-
Syntax:Example:
shellgit pull origin master -
In summary,
git fetchis more manual, allowing you to inspect changes before merging, whilegit pullis more automated and fetches and merges changes in one step.
#If you push code with secret accidently to github
- Amending a commit in Git allows you to make changes to the last commit you made. This is useful for correcting mistakes, adding missed files, or refining the commit message.
- Steps Involved:
- Make your changes
- Stage your changes
- Amend the commit:
git commit —-amend- This command combines your staged changes with the previous commit, effectively replacing it with a new commit. - Force push to github:
git push -f origin master